A techno rumble is a low-frequency sound layer shaped around the kick. Reverb is the classic starting point, but noise, drones, samples and tonal sources can all do the job. What makes it work is the relationship: when the rumble comes in, where its energy sits and how it makes room for the next kick.
If your rumble sounds huge on its own but makes the track feel smaller, start with that relationship. More distortion or a longer reverb tail can add weight, but they can also cover the kick, fill every gap and leave no room for the rest of the arrangement. In this guide, you’ll build the sound in stages, understand the choices behind a reverb or noise rumble, and put the same workflow into Kikzilla 2.
01 / The sound
What makes a techno rumble?
Listen to the kick and rumble as one low-end part. The kick gives you the attack and a recognisable pulse. The rumble extends the energy between those pulses. Depending on the track, that extension might be a short offbeat push, a rolling pattern or a dark, almost continuous bed.
A kick’s own tail is already part of this picture. A long, boomy kick leaves less space than a short one. If you add the same rumble to both, the balance changes, even before you touch an EQ. Choose the kick in the context of the track and decide how much of the sustained low end it should carry.
It helps to separate three roles: sub weight, rhythmic movement and audible texture. They can live in one sound or across several layers. You don’t need a separate track for each, but you do need to know which role you’re changing. Turning up a textured layer to get more sub can give you far too much low-mid energy.
The comparison below uses the same passage before and after Kikzilla 2. Listen for the energy between the kicks and whether the attack stays clear. Headphones or monitors will reveal more of the change than small laptop speakers.
The sound
Hear the space fill in.
Switch between the kick and the same passage with rumble. Playback stays at the same point.
Rumble 01
130 BPM
Compare the source with the same passage processed by Kikzilla 2. Start playback, then use the two comparison buttons to switch versions.
Play a demo and switch between before and after. Use headphones or monitors: most of what changes sits below what laptop speakers can play.
Rumble
02 / Timing & groove
The groove lives in the envelope
The source gives the rumble its character. Its amplitude envelope gives it a place in time. Start determines when it opens, attack controls how it rises, hold keeps it at a level and release determines how it falls away. The curve between those stages matters as much as their length.
Start too early and the rumble can compete with the kick’s body. Start too late and the low end may feel disconnected. A fast rise creates a more obvious rhythmic event; a gradual rise can feel like pressure building behind the kick. The useful setting is the one that supports the groove you’re making.
At 140 BPM, a quarter note lasts about 429 ms. An eighth note lasts 214 ms and a sixteenth 107 ms. That is the entire window you’re working inside when the kick plays on every quarter. A 250 ms release behaves differently at 125 BPM than it does at 150 BPM. Think in relation to the beat, then listen to the actual transition between kick and rumble.
Try the timing model below. It shows a simplified kick decay and a rumble envelope, not a recording or a plugin measurement. Move the rumble start and its peak to see how the overlap changes. It won’t play sound; use it to understand the shape you’ll listen for in your session.
One beat = 429 ms. Rumble starts at 51 ms and peaks at 206 ms. Percentages refer to one beat. The real kick, source and envelope curve will change what you hear.
03 / Reverb rumble
How to make a reverb rumble in Ableton Live
For a classic reverb rumble, keep a dry kick and create a parallel path for the tail. In Ableton Live, an Audio Effect Rack with a dry chain and a rumble chain is one way to do it. A return track is another. The important thing is that you can shape and balance the rumble independently.
- Start with the kick. Choose a sound with an attack and body that suit the track. Listen to how long its bass lasts before adding another layer.
- Feed a fully wet reverb. Set the reverb on the parallel path to 100% wet. The room character, size and decay change the density and resonances of the tail. A longer decay gives you more material, but doesn’t decide its final groove.
- Shape the spectrum. Use a low-pass filter or EQ to reduce the bright splash. Remove excessive deep energy only where it is causing a problem. Keep checking the kick and rumble together.
- Add saturation if the sound needs it. Distortion before the reverb changes what excites the reverb. Distortion after it reshapes the tail. Compare both at similar output levels.
- Shape the level around the kick. Use ducking, a volume envelope or a rendered audio clip with fades. Let the kick establish its attack, then bring the rumble forward at the point that makes the groove move.
- Balance in the full track. Bring in hats, percussion and the main musical part before committing to the amount of rumble.
This is a starting structure, not a required effect order. A delay before or after the reverb can create a different rhythm. A resonant filter can make the tail more tonal. Change one stage at a time so you can hear what it contributes.
Remember that a reverb has a history. The first kick after silence can produce a different tail from a kick in a running loop. When resampling, let the pattern play for a few bars and record a stable section. Check the loop boundary and fades before repeating it through the track.
Both paths meet at the mix bus. Keep the dry kick out of the wet branch. Rearrange the processing when the sound calls for it.
04 / Noise & drones
Build a rumble from noise and drones
If you want more control over the raw material, start with a noise drone or a textured sample. You can choose the character independently of the kick, then shape it to follow the same rhythm. A noisy source often gives you a less obviously pitched foundation, although filtering and resonances can still make particular frequencies stand out.
Pick an interesting section and loop it over a beat or a longer phrase. Use a sampler envelope or edit the audio directly. Fade in after the kick, shape the rise and trim the end where necessary. Filter the material until the useful body remains. Pitching a sample down changes both its spectrum and, depending on the playback mode, its timing, so check the groove again afterwards.
In the SINEE tutorial below, Björn builds the low end from several layers. One supplies a subtle low-frequency bed, another carries texture, and a more rhythmic midrange layer adds movement. The point is to give each layer a job. If two layers do the same job, mute one and check whether the track actually loses anything.
You can create a rolling pattern by cutting a drone into sixteenths, changing the level of individual slices and adjusting their fades. Leave room where the kick needs it. The small changes already present in the recording can make the repeated pattern feel alive without adding a new synth line.
Reverb and noise remain useful alternatives. Björn’s preference for noise in these sessions describes a production choice, not a rule against reverb. For one track, the reverb’s resonances are the character you want. For another, a drone gets you closer in less time.
Build a rumble from noise, audio slices and layers.
Loads YouTube on click · German audio
05 / Ducking
Shape the groove with sidechain and ducking
Producers often say “sidechain” when they mean making the bass quieter around the kick. A sidechain is the signal path used to control something; ducking is the level reduction you hear. A compressor is one way to do it. A triggered volume envelope or carefully edited audio can achieve a similar arrangement of space with different controls.
A sidechain compressor responds to its detector, threshold, ratio, attack and release. That response can sound musical, but it may also change when the kick’s level changes. A triggered envelope gives you a more explicitly drawn shape. Audio fades let you decide exactly where a particular phrase should open and close.
A free-running, tempo-synced shape works well with a regular four-on-the-floor pattern. If the kick skips a beat or changes its rhythm, that shape can keep pumping through the gap. A kick-triggered envelope can follow the actual pattern instead. Choose the trigger behaviour as deliberately as the curve itself.
Too much ducking can remove the body you wanted the rumble to add. You don’t always need silence under the entire kick. Start with enough reduction to make the attack clear, then shorten or soften the dip until the two sounds feel connected. At very fast envelope settings, listen for clicks or a new buzz caused by abrupt level changes.
06 / Mixing the low end
How to mix your kick and rumble
Start with level before reaching for more processing. Bring the rumble down, then raise it until it supports the groove. If the attack disappears as soon as the rumble becomes useful, investigate timing and spectrum rather than continuing to turn it up.
Separate weight from mud
The deepest part of the spectrum carries weight, while the upper bass and low mids carry much of the body and audible texture. Those regions need to fit the kick, the bassline and the rest of the arrangement. There is no universal crossover frequency that makes every techno kick and rumble work.
Sweep an EQ gently to locate a resonance, then decide whether it is a problem in context. A rumble that sounds a little lean in solo can be exactly right once the synth and percussion return. Equally, cutting every low-mid frequency can leave the mix hollow. Reduce the part that masks another sound, not everything that looks prominent on an analyser.
Check phase, routing and mono
Two sounds occupying the same frequency range can mask each other. Their waveforms also add together, and their relative phase can reinforce or cancel parts of the low end. These are related listening problems, but they are not the same thing. An envelope can reduce overlap; it does not automatically align phase.
If the low end becomes unexpectedly thin, check for accidental parallel copies first. Then compare polarity and listen in mono. A polarity flip can help a particular relationship, but it isn’t a universal fix for a moving reverb tail. Stereo texture can be useful higher up; make sure the foundation still holds together when summed to mono.
Use references at a comparable level
Compare with tracks that have a similar arrangement and energy. Match listening levels before judging the amount of bass. Use an analyser to support what you hear, especially when the room makes one note seem much louder than another. A meter is useful evidence, not a target curve you must copy.
07 / Density & headroom
Add density without losing the groove
Saturation creates harmonics and changes the waveform. It can make a dark rumble easier to hear on smaller speakers, but the added upper-bass and midrange energy also needs space. If the sound becomes louder and rougher, reduce the output and compare again before deciding it is better.
Once the individual parts work, processing their sum can make kick and rumble feel more connected. Bus compression changes their shared dynamics. Clipping reshapes peaks and can increase perceived density. Both can also flatten the attack, alter the tone or pull attention towards the rumble.
Use small moves and listen to the whole groove. Compare at a similar perceived level, then check the actual output peak as well. Loudness matching and peak control answer different questions. A denser signal can use less peak headroom while still sounding more aggressive.
Leave room for the rest of the mix and the processing that follows. There is no single LUFS number that a kick-and-rumble bus must reach. Values from one finished production are not a useful universal target for a different tempo, kick or arrangement.
08 / Inside Kikzilla 2
Put the workflow into Kikzilla 2
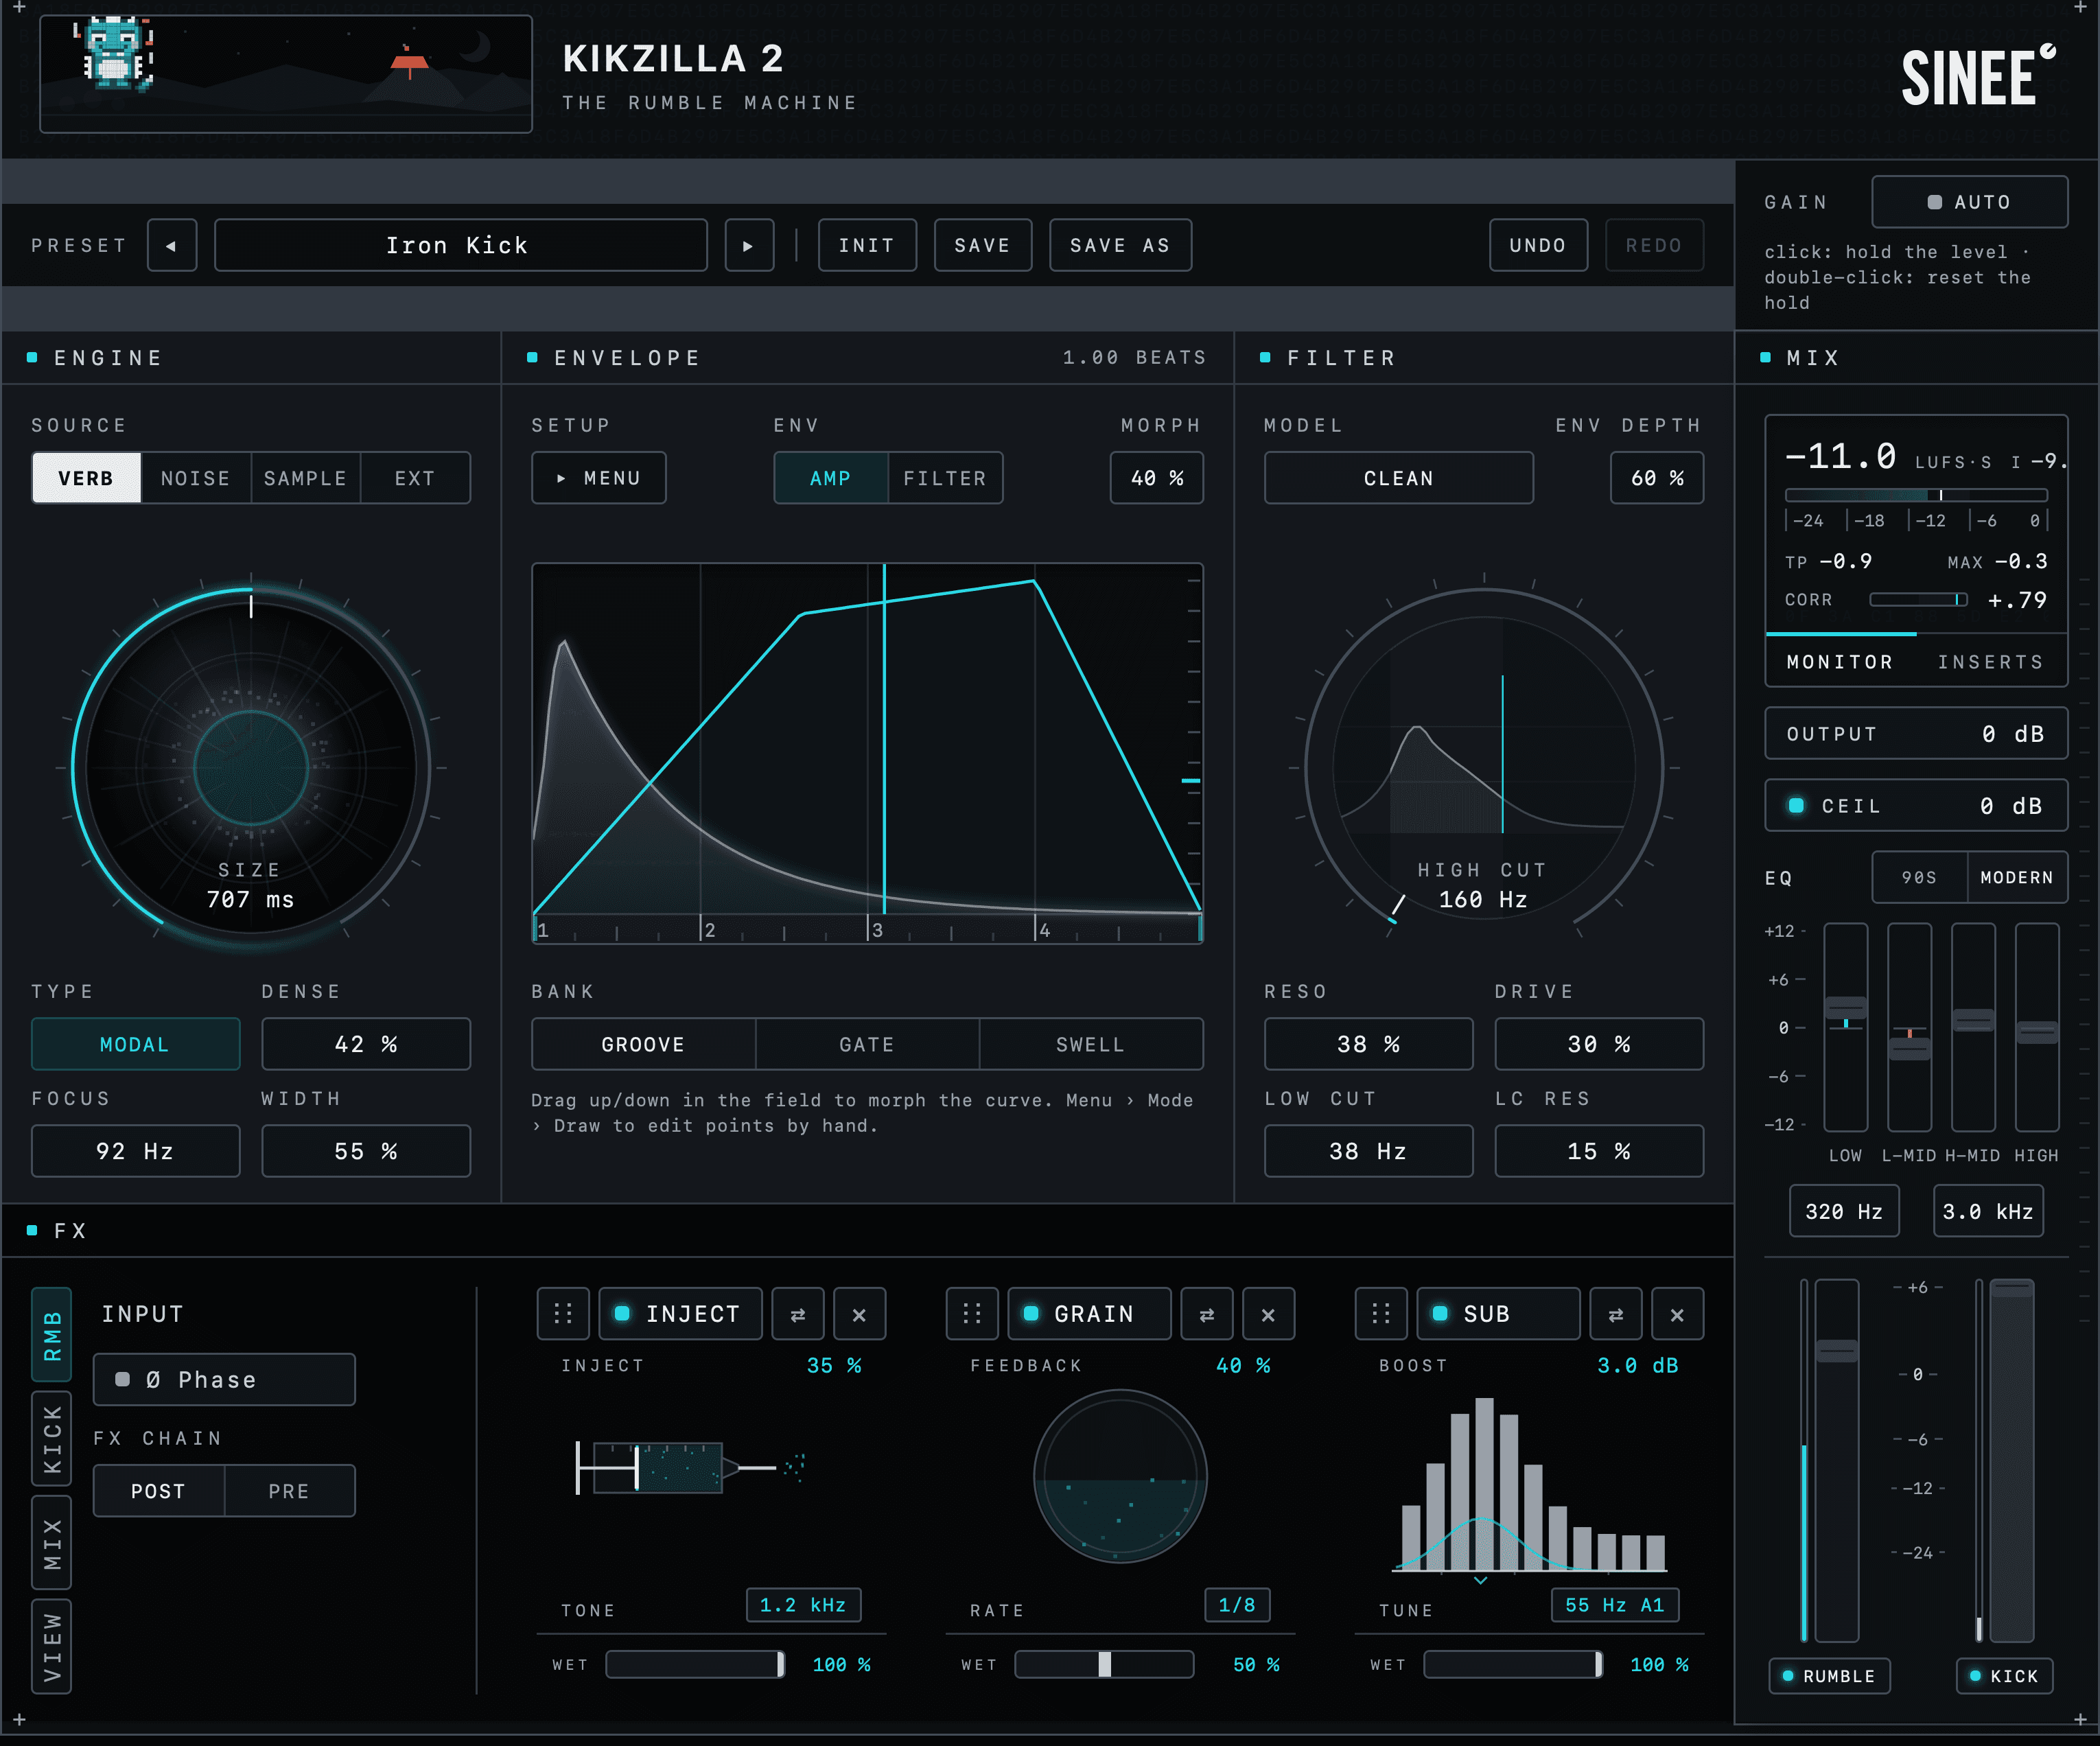
Kikzilla 2 brings the source, envelopes, filter and processing chains into one place. The advantage is that you can work on their relationship without rebuilding the routing whenever you change direction. Your own kick remains the starting point.
- Choose the foundation. Use a Verb model for a kick-driven tail, a Noise model for independently generated material, or Sample for one of the included loops. Modal is a useful starting point for a classic rumble; Bloom builds its energy later. Choose by the role the track needs.
- Shape the movement. Set the amplitude envelope’s length and trigger behaviour. Use Morph to explore different curves or Draw to place the rise and fall yourself. The kick display gives you a visual reference while you listen.
- Set the tone. Adjust the main filter and drive. Use the separate filter envelope when the rumble should open up and darken independently of its level. Get this working before filling every effect slot.
- Process where the problem is. Use the kick chain for the kick, the rumble chain for the generated or external layer, and the mix chain for their sum. EQ4 can target one branch. D-Mud can reduce overemphasised lower mids; it does not replace checking the sub and the timing.
- Finish the balance. Set the kick-to-rumble relationship, add shared processing if it helps, and check the output in the track. Auto Gain can help manage the rumble level, but the musical balance is still your decision.
Already have a bassline? Feed it into the plugin’s external input and select Ext. In the standard setup, the kick enters the main input, the bassline enters the sidechain input, and the detector listens to the main input. You can then shape the bass around the kick. Check the DAW routing so the unprocessed bass is not also reaching the master unintentionally.
Kikzilla 2 offers nine internal sound models, plus Sample and Ext. Those models are alternative sources, not nine simultaneous layers. The included sample bank gives you 107 loops; for your own externally played material, use Ext. If you only need the direct Verb/Noise rumble workflow, Kikzilla Lite provides a simpler panel and is included with Kikzilla 2.
09 / Troubleshooting
When the rumble still doesn’t sit right
- The kick loses its punch.
- Lower the rumble and move its rise later. If the attack returns, refine the overlap before changing the kick sample or adding more transient processing.
- The low end sounds muddy.
- Listen for excess low-mid energy in the rumble and in the other parts. Adjust the source or filter first, then use EQ where needed. Check the full track after each change.
- The rumble feels hollow.
- Compare another source or a different reverb character. Check strong resonances, polarity and unintended parallel routing. More gain will not correct cancellation.
- The groove feels static.
- Change the envelope’s peak and curve. Try a shorter phrase, a small level accent or movement in the filter. Avoid adding another layer until you know what rhythm is missing.
- It disappears on small speakers.
- Check whether there is any useful upper-bass or midrange information. Controlled saturation or a separate texture layer can help. Keep that layer out of the way of the main musical part.
- The first kick sounds different.
- A reverb may need time to build up. Listen after a few bars, and if you render the rumble, capture the running state and check the transition at the loop boundary.
10 / Common questions
Common techno rumble questions
Does a techno rumble have to be in key?
A clearly tonal rumble should make musical sense with the track. A diffuse noise-based rumble may not have one stable note to tune. Listen for prominent resonances and sustained pitches instead of forcing every texture onto a tuner.
Do I need reverb or a sidechain compressor?
No. Reverb is one source, and sidechain compression is one way to create space. Noise, samples, triggered envelopes and audio fades can fulfil those roles too. The useful question is which approach gives you the character and timing you want.
Can I use a bassline and a rumble together?
Yes, if their roles are clear. A midrange bassline can add notes and rhythm over a deeper rumble. Two sustained sub-heavy parts are harder to balance, so decide which one carries the bottom and arrange or filter the other around it.
How loud should the rumble be?
Loud enough to support the track without hiding the kick or dominating the arrangement. Start low, raise it in context and compare with a suitable reference. A fixed fader position or LUFS value cannot make that choice for you.
Can I build this with stock plugins?
Yes. The reverb chain and audio-editing methods above work with stock tools. Kikzilla 2 is useful when you want those source, shape and processing decisions together in one workflow.
Start your next session with the kick and one rumble source. Get the timing right, fit the spectrum, then bring the rest of the track back in. Add another layer only when you can name what it contributes. That keeps the low end deliberate, and gives every change a reason.
Try it in your own track
Your kick. Your groove.
Bring your own kick, choose a source and shape the space around it. Kikzilla 2 is free to try for 14 days.